Friday, May 4, 2012

Return of the Roman Shades...

I still remember the day back in '09. I woke up one morning and all of my Roman Shade auctions on eBay had been canceled. How could this be? Roman Shades are so aesthetically pleasing, so practical, so...not illegal! I checked my email and to my surprise, eBay notified me that ALL 'Brand X' Roman Shades everywhere had been recalled.

"Huh?", I wondered. "What in the world could be unsafe about something hanging in a window?"

After a bit of research and a not so friendly call to eBay I found that there was an industry wide voluntary recall of Roman Shades and that from here on out, they were banned from eBay in their present form. Apparently, a child had gotten its neck caught in the cords of a roman shade somewhere and was seriously injured from it.


I had a few hundred shades in stock, but after hearing the reason for the recall and looking at the design of the shade it made sense to me. I have kids of my own, I wouldn't want anything in my home that could injure them.

But, what was I supposed to do with the few hundred shades I had in stock at the time?

My little dilemma couldn't compare to what the Roman Shade peeps at 'Brand X' must have been going through. My few hundred shades didn't compare to the tens of thousands of shades they must have had at the time of the recall. So, some heads must have gotten together and come up with a new system that could be an interim solution to this recall issue, while they came up with a permanent solution. The cordless clip system was born...

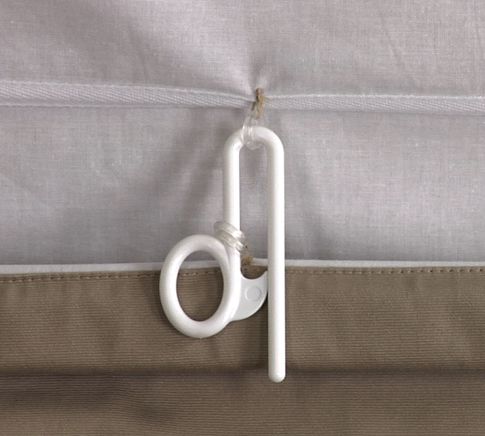
All the cords were cut and completely removed to prevent children, or people in general, from becoming strangled in the loops. Someone, who was obviously much smarter than I am, came up with these cool clips. The clips are adjusted manually, and while taking a little bit longer to adjust than the corded shades, they were safe. (When I say longer, a pull of the cord can take but a few seconds. The shade can be adjusted with the clips in less than 15.46 seconds.) The clips go through the loops where the cords once were and lock the loops into place to give the same 'Roman Shade-y' effect as the corded version gave...The gathering, the ruffling...call it what you may.


The solution was ingenious! It was also temporary though, while 'Brand X' came up with a more permanent, expensive solution. The permanent solution involves a roller shade, cordless system. They are completely and utterly amazing! They also range in price from $200-$300...each! Go buy some if you have that kind of cash laying around in this 'ruffled-up' economy. (pun intended)


Once this new system was in place, what was 'Brand X' to do with the thousands of shades they had in stock at the time...you know, the ones with the interim clip system? Well, these shades ended up on our shelves in our warehouse. Homeless. Cold. Lonely. Tired.

So, we're putting them up for adoption. They are in perfect condition, in their original boxes with all the mounting hardware you would need. The plastic clips are shiny and new. Detailed mounting instructions are included along with the ingenious interim clip system instructions. No cords to wrap around little necks in these babies! (pun not intended)


And here's what a few of them look like:


(Yes, we realize roman shades aren't mounted on the outside of homes, or in cool looking telephone booths. They are mounted inside your homes...! But don't let that stop you from being creative.)

Starting at $14.99, we are pricing these to move them. Once they are gone, they are gone...so don't delay. They are kid safe, parent friendly. So, go measure your windows and give these homeless interim roman shades a home!

Tuesday, August 23, 2011

Installing a "Brand X" T-Cushion Slipcover

1. Unfold the slipcover and locate the tag that says “back”. Stand behind your piece of furniture and loosely drape the slipcover over it, using the tag as a guideline.

2. Locate the two elastic loops on the underside seat area of your slipcover. Wrap the elastic loops around the back corners of the outer seat cushions. This will help secure your slipcover in place.

3. Determine the desired length of the front and back of the slipcover. Adjust the front and back length by accumulating all excelss fabric on the seat. Note: your slipcover is designed to fit a wide variety of furniture styles. As a result, there may be more fabric than you need.

4. Begin to customize the fit by centering the slipcover and aligning the slipcover arms to your furniture arms. Pull the slipcover snugly over the front ends and the top of the arms. Tuck loose fabric in the arm area of the slipcover at the bottom of the sofa arm. Then wrap and tuck the loose fabric on the lower portion of the slipcover under the outer edge of the t-cushion.

5. Tuck all excess fabric in the crevices of the furniture. Be sure to tuck between the arms and seat cushions, back and seat cushions, and between the arms and the back of the furniture. The tighter you tuck the excess fabric, the more fitted look you will achieve. (We recommend using the Loose-Fit tailoring set, which is sold separately, to secure your fabric in the crevices.

6. Center the slipcover skirt pleat with the middle of your furniture. Locate the straps on the slipcover skirt. Wrap the skirt tightly around the base of your furniture. Secure the straps in the back with the metal D-rings on the slipcover. Tighten the straps to create an attractive, finished look.

What about the wrinkles?

Your slipcover no doubt got a bit wrinkly while in its packaging. The wrinkles will disappear over time, once you have fitted the slipcover. If you have a steamer, run the steamer slowly over the slipcover after it is installed and smooth away the wrinkles.  A warm iron can be run over the slipcover to smooth out the wrinkles as well.

Saturday, January 29, 2011

Which type of sofa do I have? T cushion, square cushion or other...

A few common questions from our customers sound a little something like this:

Which type of sofa do I have? How do I know which slipcover to choose?

Well, in order to choose the correct slipcover, you's gots to know which kind o' ugly sofa you have? Am I right or am I right?

Of course I'm right.

Pottery Barn has divided all sofas into a few basic categories and made loose-fit slipcovers to cover said sofas. The first style is a t-cushion style. With a t-cushion type of sofa, the seat cushions come out in front of the arms of the sofa...like the ugly sofas posted here:


The next category is the square cushion sofa. Again, we're going off of the seat cushions so with the square cushion sofa the seat cushions butt up against the arms of the sofa...such as the following ugly sofas:


The third category is "everything else". For this category, Pottery Barn created the dropcloth slipcover. This type of slipcover is like a big piece of fabric that drapes over the sofa. It is easy to install and looks great! Of course, the dropcloth slipcover works well for the t-cushion or square cushion type of sofas as well.


I will do another blog post on measuring for your furniture in the next few days. In the meantime, just sit down and have a heart to heart with yourself and admit to yourself that you have an ugly sofa. Admission is the first step to getting help with your decor.

And save the environment by not throwing that old, tired, ugly sofa away.

Take a look at our products and let us know what you think.

Brent

Ugly Sofa? Slipcover it!